Understanding Headlight Alignment
Proper headlight adjustment is crucial for ensuring optimal visibility and safety, especially in vintage cars. The specific needs of vintage car lighting can often be overlooked, yet they greatly affect the driving experience, particularly during night-time or adverse weather conditions. Misaligned headlights could lead to reduced visibility, making it difficult to spot road hazards, and potentially blinding oncoming traffic.
Common issues with vintage headlights include wear and tear, bulb misalignment, and outdated bulb technology. These problems can reduce the effectiveness of the lighting system, thereby impairing a driver’s ability to see clearly on the road. Regular inspection and alignment can mitigate these issues, ensuring that headlights project light correctly and evenly.
Also read : Essential Tips for Preserving Your Vehicle”s Roof-Mounted Antenna Integrity During Off-Road Adventures
Vintage vehicles come equipped with various headlight types, ranging from sealed-beam units to halogen bulbs. Each type requires distinct alignment procedures and maintenance to function effectively. For example, sealed-beam headlights may necessitate complete replacement rather than simple adjustment when they falter. Meanwhile, halogen lights offer the advantage of switchable bulbs, providing a more flexible approach to rectifying light direction and performance. Understanding these variations is key to maintaining the classic charm and utility of vintage cars, while ensuring that they conform to modern safety standards.
Tools and Materials Needed
Engaging in vintage car maintenance requires a careful selection of tools and materials, especially when it comes to headlight alignment. Ensuring optimal visibility and maintaining the classic appeal of your vehicle can be achieved with the right equipment.
This might interest you : Mastering Spark Plug Replacement: A Step-by-Step Guide for Compact Engine Bays
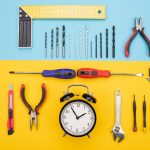
For headlight alignment, some essential tools include:
- Screwdrivers: A must-have for adjusting screws that secure the headlight assembly.
- Level: This helps you assess whether the headlights are positioned correctly.
- Tape Measure: Vital for measuring distance from the vehicle to ensure consistent alignment.
In terms of materials, using vintage-specific replacement parts is crucial. When adjusting or replacing headlights, consider using era-appropriate bulbs and lenses. These parts not only maintain the authenticity of the vintage vehicle but also ensure compatibility with the car’s original electrical systems and design.
Vintage-specific replacement parts are important because they maintain the car’s historical integrity. They match the specifications of older vehicle models, which ensures that the functionality aligns with the car’s other components. Without them, you risk altering the vehicle’s classic appeal and potentially affecting its performance. Engaging in a diligent maintenance routine using these tools and parts will keep your vintage car both stylish and road-ready.
Preparing Your Vintage Car for Alignment
Getting your vehicle setup right is crucial for a successful alignment. Start with a thorough pre-alignment checklist. Check if your suspension system is in optimal condition. Look for any worn-out or damaged parts that might need repair or replacement. Remember, faulty suspension components can lead to inaccurate alignment results.
Examine the tires closely. Ensure that the tire pressure is correct and the tread is even. Uneven tread can impact the alignment process. Replace any damaged tires before proceeding.
Positioning your car correctly is another essential step. Make sure the car is level on a flat surface. Use a jack to lift the vehicle if necessary, but ensure it’s securely supported before technicians proceed. An unlevelled vehicle can distort alignment measurements, leading to potential adjustments errors.
Safety precautions are imperative. Always use appropriate gear and tools. Ensure the workspace is clear of any obstacles that could cause accidents. Double-check that all fasteners are properly tightened and no wrench slips.
By meticulously following these steps, you ensure your vintage car is ready for a precise and effective alignment process.
Step-by-Step Guide to Aligning Headlights
Aligning your vehicle’s headlights correctly is crucial for safe driving, whether you’re undertaking this task as a part of routine maintenance or restoring vintage headlights.
Measuring Headlight Height
To determine the correct height for your vintage headlights, measure from the ground to the center of your headlights while the vehicle is on a level surface. Mark this height on a wall using painter’s tape to establish a reference point. This step ensures your headlights are not only correctly aligned but also optimally focused, reducing glare and enhancing visibility. Accurate measurements are essential for effective headlight alignment, minimizing potential alignment issues.
Adjusting the Horizontal Alignment
Begin with the detailed steps to adjust the horizontal beam direction. Ensure the vehicle is parked about 25 feet away from the wall with your reference points. Common mistakes include not considering vehicle load and not parking on a level surface. Always test the alignment after adjustments to confirm that the beam is centered correctly.
Adjusting the Vertical Alignment
To adjust the vertical beam position, locate the adjustment screws behind the headlight assembly. Rotate them until the top of the light beam is at or slightly below the horizontal reference line. Understanding beam patterns and their significance aids in achieving the optimal light path. Always check alignment on a level surface to ensure consistent results.
Troubleshooting Common Alignment Issues
Experiencing misaligned headlights can be frustrating, especially after making what seemed to be proper adjustments. It’s essential to identify the signs of such issues. If you notice uneven lighting, where one side appears dimmer or the beams cross each other, your headlights likely suffer from misalignment. Another sign can be frequent complaints from other drivers about blinding glare from your car.
Identifying and Solving Alignment Problems
Persistent alignment issues often arise from improper bulb positioning or faulty wiring. Ensure that the bulbs are correctly seated in their housing. Misplacement can result in scattered beams. Check the wiring as well; loose connections can affect the light output, leading to perceived alignment issues.
Here are ways to address these problems:
- Adjust the bulb positioning by reseating them into the correct slots.
- Inspect and secure any loose wiring to maintain steady light performance.
Seeking Professional Assistance
If after these adjustments the lights remain problematic, it may indicate a deeper issue. In such cases, it is advisable to seek professional help. An expert can diagnose complex problems such as malfunctioning adjuster mechanisms or inconsistent power supply to the bulbs, ensuring your headlights are safely aligned.
Maintenance for Vintage Headlights
Owning a vintage vehicle comes with a unique set of challenges, especially when it comes to headlight care. Regular maintenance is essential to extend the lifespan of these older headlights and ensure they remain functional and safe on the road. Firstly, integrate a consistent cleaning routine for your vintage headlight lenses. Using a gentle, non-abrasive cleaner helps avoid scratching or damaging the glass or plastic. Ensure the inside of the headlight housing is moisture-free to prevent fogging and potential electrical issues.
For those seeking improved visibility without compromising the vintage aesthetic, consider upgrading the lighting system. Options such as halogen or LED bulbs offer enhanced brightness and longevity. However, check compatibility with your vehicle’s existing electrical system before making modifications.
Routine checks of the wiring and connector integrity can prevent electrical faults. Pay close attention to signs of wear or corrosion that can affect performance. Address any issues early to maintain optimal function. Maintaining the exterior finish of the headlight housing is equally crucial. A light polish can help restore the original shine and remove minor scratches.
Incorporating these vintage vehicle maintenance techniques can significantly enhance both the longevity and performance of your headlights.


